Killer Floods

A review with a backstory.

Last summer, I did a flying gig that started in Spokane and had me flying over a good portion of the state. The client was a video production company based in the U.K. that was working on a NOVA documentary about the ice age floods, which are often referred to as the Missoula Floods.

If you don’t know anything about the Missoula Floods, here’s the short version. Millions of years ago, when the Cascades were a chain of active volcanos, they laid down layer after layer of lava that became (mostly) basalt rock. The Ice Ages came and a sheet of ice stretched from the North Pole down into the northern United States. In Montana, the ice sheet formed a dam across the mouth of a valley and huge volumes of water accumulated behind it. Over time, the ice dam was eroded and broke free, releasing all that water very quickly. It came downstream, across Idaho and Washington State, carving out some very interesting canyons and other formations. Then the ice dam was created again and broke again and created again and broke again. This cycle happened at least 15 times, depending on who you talk to, starting about 16,000 years ago. It explains the modern geology of Central Washington state’s coulees (those carved canyons), potholes, dry waterfalls, and so-called Scablands. You can read more about this in Wikipedia. Or you can just watch the documentary I’m reviewing here.

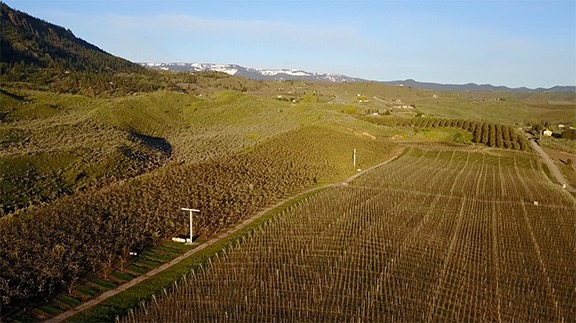
The best way to get an idea of the massive scale of the hydrologic action resulting from the Floods is from the air. Sure, you can take a hike into a coulee or to the top of Dry Falls and look around, but it isn’t until you get a few hundred feet up that you realize just how enormous these places are. So the film crew looked for a helicopter with a Cineflex camera mount. Of course, there aren’t any of those outside a big city and they did have a budget so bringing one in was not an option. They did, however, find my helicopter company, Flying M Air, which, at the time, owned a Moitek gyrostabilized camera mount (which I’ve since sold).

I should mention here that this is the one and only time that damn camera mount got me a flying gig. I bought it to increase my aerial photo business and very seldom used it. I charged a fee for its use and it probably finally paid for itself sometime in 2014; I’d owned it since 2009. It was a beautiful piece of equipment, exquisitely hand made right here in Washington State, but it weighed a ton and took 30 minutes to assemble and another 20 minutes to break down. I hated dealing with it, despite the $500 per use fee I charged. Packed in two huge Pelican cases — one for the mount itself and one for the three Kenyon KS-8 gyros that went with it — it took up space and gathered dust on my garage floor. I sold it to an LA-based pilot for just $5K this past summer. What a steal. The gyros alone were worth more than that — but I don’t miss it one damn bit. It was not one of my best asset acquisition decisions.

The Flights

Turns out that they needed a videographer who could use the mount and had appropriate equipment to mount on it. I turned to Charley Voorhis of Voortex Productions, one of the two local video companies I’ve worked with. Charley has some impressive equipment — I think he brought one of his RED cameras for this gig — and lots of experience with the mount. (I almost wish he’d bought it.) Then I stepped back and let him make his deal with the client. All I cared about was flying.

The day of the flight came and we left, bright and early, for Spokane. I’d already set up the mount as far as I could, tying it down with gaffer tape since it would be out of balance until a camera was on it. I’d put the door back on so we could maximize cruise speed to get to the client meeting site; the helicopter is limited to 100 knots with any door off. We got there on time and met at the FBO to come up with a plan. I had them top off the tanks with fuel and removed the door where the camera mount was. Charley set up his camera.

We wound up doing several flights. The first was a long one that started in Spokane, flew directly out to Dry Falls — which is about 2/3 of the way back to Wenatchee — circled that more times than I can count, and then headed down the smaller lakes to Ephrata, past Moses Lake, and over the Potholes Reservoir. On board were me (of course), Charley, and the video director (or producer?) who told Charley what shots to get. The mount took up a whole seat but I wouldn’t have taken a third passenger if I could; I have a strict policy regarding the number of people on board for photo flights and always limit it to three.

Dry Falls Photo Shoot
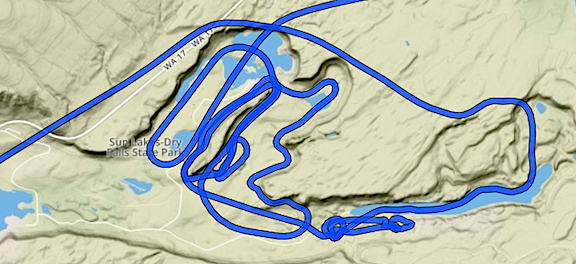
Here’s a closeup of my track, recorded automatically by ForeFlight, for the time we were in the Dry Falls area. What’s ironic here is that we flew around in a noisy helicopter for a good 15 minutes and likely bugged the hell out of people on the ground. A drone probably could have gotten the same footage without disturbing so many people. (Of course, it would have taken most of the day.) But because Dry Falls is a Washington State Park, drones are prohibited. Go figure, huh?

Dry Falls
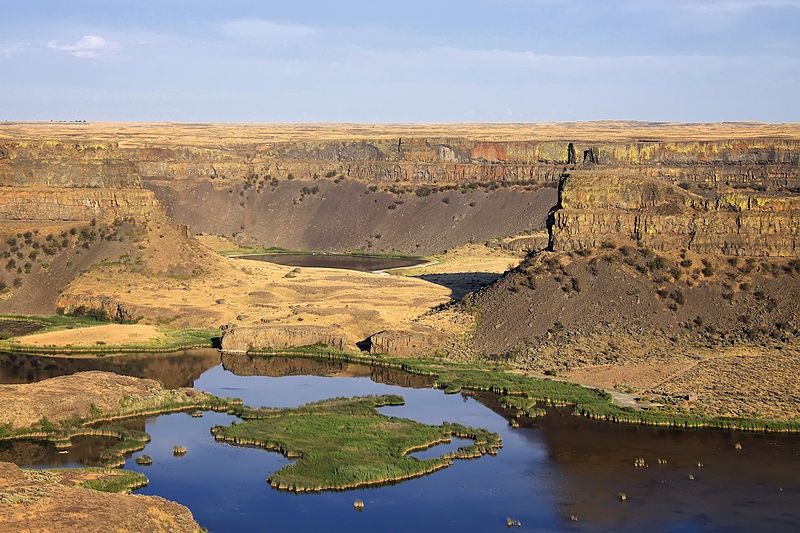
Photo of Dry Falls by © Steven Pavlov / http://commons.wikimedia.org/wiki/User:Senapa, CC BY-SA 3.0, https://commons.wikimedia.org/w/index.php?curid=16059590 I think that most of the footage shot from my helicopter and used in the documentary was shot in this area.

After refueling at Moses Lake — we’d flown about 2-1/2 hours since leaving Spokane — we pretty much high-tailed it back to Spokane. Then we did two flights south past Cheney and east of Ritzville. That’s where the Drumheller Channels are. I’d never even heard of the place, but apparently it’s one of the best examples of the Channeled Scablands. One flight was with the same group on board; the other was with the geologist you see in the documentary. When the geologist was on board, the client’s own videographer flew with me, sitting beside me to shoot the geologist in the seat behind me as he spoke about what we were flying over. That’s probably also when they got footage of my helicopter’s panel and even me. Those two flights each took about a 1-1/2 hours with refueling in Spokane between each one.

After that, we were done. I dropped everyone off in Spokane, retrieved the door, and put it back on. Charley and I sped back to Wenatchee where we went our separate ways.

I think the whole gig was supposed to be just 5 hours, including travel time, but I flew (and billed for) more than 9. It was a very lucrative gig. But what was [almost] better was how much I saw and learned about the geology of the state. That’s one of the reasons I like doing aerial photo work; I get to see and learn a lot.

The Documentary

I have to admit that once my invoice was paid — which took a little effort since the money was coming from the UK — I didn’t give the project much thought. I didn’t even blog about it. That’s probably because last summer was very busy for me and I did a lot of cherry drying work. I even dried cherries later that day. I’d stopped blogging about my interesting flights, although I really don’t know why.

So imagine my surprise when a lawyer friend asked me yesterday in an email if he’d just seen my helicopter in a NOVA episode.

I went online and found the NOVA episode titled Killer Floods immediately. And although I rarely watch television during the day, I’m recovering from a cold and figured it was a good way to kill an hour. So I sat down, fired up the Roku with PBS, and watched it.

Let me start by saying I generally like NOVA documentaries. At least I used to. They’re filled with facts and good videography and leave you feeling better educated about topics than you were before you watched them. But I don’t know if it’s a general trend in documentary filmmaking or just a new NOVA style, but it seems to me that they’re trying too hard to sensationalize the topic or apply it to today’s world.

Two things immediately struck me about this one.

First, the name: Killer Floods. This particular documentary covered three flood events, all three of them were prehistoric. So although it’s likely that they killed something — plants? animals? — they didn’t have an impact on man at the time. In addition, their significance was not the fact that things were killed but more that the flooding changed the shape of the landscape by suddenly and violently eroding and washing away rock.

Second, the attempt to suggest that the three floods documented in the video have anything whatsoever to do with today’s flooding due to climate change. They managed to include footage from the flooding in Houston from Hurricane Harvey — a mere two months before air time! — which has absolutely nothing to do with these three prehistoric floods. Yet the narrator suggested that they might be related. I think that’s stretching it beyond reasonability.

But hey — I get it. They want people to watch so they come up with sensationalized names (see also Killer Hurricanes and Killer Volcanoes), and try to get people interested by pointing to recent events that they’re familiar with. After all, is the average person going to be interested in a documentary about how three prehistoric flood events changed the landscape in relatively remote areas of Central Washington State and Iceland or under the English Channel? I doubt it. NOVA is competing with reality TV, sitcoms, and sports. While I’m interested in just about any topic NOVA covers, most people aren’t. Sad but true.

That said, I thought the documentary was well written and produced, with plenty of good videography, interview clips, and narration. It walked viewers through the logical process of figuring out how each of the three landscape formations they were researching were actually made. (I already explained the one in Washington State; I’ll let you watch the documentary to learn about the other two.) The Washington one was a bit slow for me because I already knew the answer but I found the other two fascinating. I’ve been planning a trip to Iceland for late next summer and may extend it a few days to take in some of the sights shown in the documentary. And now I have a fresh desire to see the White Cliffs of Dover.

But what really tickled me was seeing my helicopter near the very beginning of the documentary, with the Flying M Air logo prominently displayed. Later, a shot shows my door with my name on it. And somewhere else near the beginning, you can see the helicopter’s controls and even a quick shot of me looking like a bit of a bum in my gray sweatshirt.

Those glimpses were enough to get my brother, who never picks up the phone, to give me a call yesterday evening. “I’m watching NOVA. Is that your helicopter?”

And that set off an hour-long conversation about all kinds of things. Heck, I talked more with him yesterday evening than I had all of last year. (Seriously: he just doesn’t like to talk on the phone.)

This obviously isn’t the first time I’ve been involved in a video production. I’ve been flying this helicopter since 2005 and have done countless video/photo shoots over the past 13 years. But I’m pretty sure this is the first one that has appeared on PBS or a highly respected documentary series like NOVA.

It’s about as “big time” as my little company will get — and that’s okay with me.

If you’re going to watch it, watch it soon. The website says it “expires” on December 7. If you’re really interested in flood-related geology, why not get the video? You can buy it on iTunes.

Look for me in the credits.

More about the Wind Machines

A few new videos.

Back in April 2015, I blogged about the wind machines commonly used for frost control in the Wenatchee Valley. Resembling tall fans, different versions of these machines can be found in agricultural areas throughout the west wherever frost — especially early spring frost — is an issue. Around here, they’re often in low areas subject to thermal inversions.

Wind Machine
The wind machines that were running this morning. That’s the Mission Ridge Ski resort in the background. Photo shot with my Mavic Pro.

The machines are fans that generate wind. The blades spin fast — faster than you might think watching the video below — to circulate the air. The fan heads rotate to constantly change the direction of the wind. The net result is that the air is circulated, bringing warm air from above down into the crops.

In the almond orchards of California, they use helicopters to do this. I think it’s because the orchards are so big that they simply can’t install and maintain as many wind machines as they need. The helicopters are likely a lot cheaper in the long run, especially when you have a few years in a row when they’re not needed. I’ve been on frost control contracts for the past five winters now and have yet to turn a rotor blade over an almond tree. (Global climate change?)

This winter was particularly long, setting the tree fruit back two to four weeks. The cherry trees are still blooming around here; last year, the cherries were already beginning to redden in the orchards closest to my home. Nighttime temperatures at my home have been in the low 40s. But in the orchards below me, pockets of colder air form. And this morning, they got cold enough to trigger the temperature-set auto start feature on the wind machines in the closest orchards.

I don’t know exactly when they started. I was up at 4:30, reading before getting out of bed, and I didn’t hear them. But by the time I made my coffee at 5 AM, I could hear them faintly through the walls and windows of my my home. I stepped out on the deck for a better look in the predawn light. The sound was louder and I could see two of the machines to the west spinning. My ears told me that one to the northeast, which I can only see from a handful of spots on my deck, was also spinning.

Here’s the zoomed in video I shot with my phone. When I shut up, you can hear the wind machines.

I did a Periscope — that’s a live Twitter video — of the wind machines. A handful of people tuned in and I answered questions as they came up. I was frustrated that I couldn’t zoom in. I signed off, used the video feature on my phone to capture a short zoomed-in clip, and posted it on Twitter. Then the sun rose and the light got good and I did another Periscope that was mostly to show off how beautiful the area was. The wind machines droned in the background of my voice as I described various things and answered questions.

I went inside, washed some pots from cheesemaking, and listened to the radio. I could hear the wind machines faintly through the walls and windows. I was sort of bummed out that I couldn’t give people a better view.

Part 107 Explained
Want to become a commercial drone pilot? Start by learning all about the FAA’s Part 107. This book will help. Buy the ebook edition on Amazon or from Apple. Or buy the paperback edition on Amazon.

And then I remembered my Mavic Pro.

It took only two or three minutes to set it up. I launched it from my deck, got the video camera going, and sent it to the wind machines, stopping before it got so close that the wind could affect it. The light was beautiful and the image the Mavic sent back to me was clear. I hovered for a while to capture a good clip and then flew around a little, just taking in the view with the camera running. I stopped the video camera, took some stills, and then flew home for some more video of my home and the area around it.

Back inside, I made a fresh cup of coffee and spent a few minutes editing the video and setting it to music. It’s unfortunate that the Mavic doesn’t capture sound, but I understand why: it would be capturing its own buzzing sound, which isn’t pleasant. So music will have to do.

A side note here: I’ve been thinking a lot lately about how much I like living here. I realized — and I think I mentioned in one of those Periscope videos — that I like it here more than anywhere else I’ve lived. I’m not sure if it’s because of the place itself or the fact that I have a home with an amazing view built to exactly meet my needs or because after a stifling relationship that went on a lot longer than it should have I finally have the freedom to do what I want to do with my life and time.

Whatever the reason, I just want to remind readers that we all have just one life and it will eventually end. Don’t waste it stuck in a rut or in a place you’re not happy.

Mavic Pro Observations

What I’m seeing, liking, and not liking — so far.

Mavic Pro
The Mavic Pro, unfolded for flight. Although the manual says to remove the clear protective cover over the gimbal, I suspect it might be usable during flight — if it doesn’t fall off. I remove it.

I’ve had my new DJI Mavic Pro drone in my hot little hands for about four days now and have taken it on a total of five missions so far. (More on my use of the word “mission” shortly.) I’ve developed some definite thoughts about it, from the perspective of a pilot, photographer, videographer, and new drone pilot. I thought I’d take a moment to share them with readers who might be considering the purchase of a drone for photography.

And that’s a big part of what this drone is to me: it’s a tool for making photos and videos. While some people buy drones for the flying aspect of them and actually race them around obstacles, etc., I have no intention of doing that. (At least not yet.) And if you’re thinking of buying a drone for that purpose, I don’t recommend a Mavic, despite what the DJI website shows it capable of doing. I’m sure you can buy a less expensive drone that’ll be better for racing (and crashing). Do your homework. See what the other guys (mostly) and gals are racing and what they have to say about their equipment.

Portability

Folded Mavic
It folds up small.

The most obvious benefit to having a drone that folds up into the size of a one-liter bottle of coke is portability — and that’s the main reason I bought the Mavic. Its folded size is less than 4 x 4 x 8 inches.

The truth of the matter is, my friend Jim offered me a smoking deal on his DJI Phantom 4 because he was upgrading to a Phantom 4 Pro. Buying his gently used drone would have saved me a bunch of money. But the reality is that I travel a lot, often without a lot of space for baggage. The Phantom 4 does not fold up at all and although there are carrying cases available for them, they’re not easily brought on a four-month trip in a truck camper or with gear in the back of a helicopter or on a motorcycle. And don’t even think about taking a hike with one.

Although I bought the Mavic package that included a carry bag smaller than a shoebox that can fit the drone, the controller, at least two spare batteries, and a battery charger, I stopped using the bag on Day Three, switching instead to a very small backpack I’d bought around Christmas time for hiking. The DJI bag was a snug fit for the drone and I worried about damaging it as I crammed it in and dragged it out. The bag is surprisingly bad design for a drone that has an amazingly good design. If you are considering the purchase of this bag, I recommend you skip it. If you want a padded bag, look for a small camera bag. (Or buy mine. It’ll likely go on eBay next week.)

With portability comes the question of durability. A Twitter friend asked me if it was durable. Are any of these things durable? I said no. But I also said it isn’t fragile. Later, in my mind, I equated it with the difference between those standard green David Clark aviation headsets (durable but kind of clunky) and Bose ANR headsets (not durable but lighter and sleeker). Neither will break if you handle them with care, but the Bose headsets are more likely to break if you don’t. The Mavic, of course, would be the Bose in this analogy.

And yes, it’s light. The drone, onboard battery, controller, and two spare batteries weigh in at under 2-1/2 pounds.

Design

I am completely blown away by the drone’s design. The way it folds up so neatly, the way the blades fold to make it even smaller, the way the micro SD card fits into the side, the way the battery is so well integrated with the drone’s body, the way the tiny camera lens and gimbal hang from the front — it’s all extremely well thought out and executed.

That’s the design for portability and flight. The design for actual use is a bit less rosy.

As a regular commenter on this blog pointed out in comments for a previous post this week, the Mavic sits very close to the ground. It only has two legs (on the front) and two little stubs on the back. That puts the gimbal mounted camera just inches off the ground. If you’re flying it from grass or from rocky terrain, that camera is going to be in the grass or bumped by rocks. And if there’s dust, that dust is going to fly on landing and take off (just like with a helicopter) and possibly get into rotor heads or gimbal parts. I had the foresight to order a foldable landing pad to operate from — this helps ensure a safe, clean environment for operations. But I also have to take care on landing to make sure it lands on the pad. Later, I picked up a 3 x 4 rubber-backed mat that I’ll likely wind up using in my garage when I get home. Until then, it’s an expanded landing zone when I travel with my truck.

The only real complaint I have about the design is related to the plastic clamp that holds the gimbal immobile during transport: I have a heck of a time getting that damn thing on. I assume I’ll better at it one of these days; I sure hope it’s soon.

Controller

The Mavic’s controller also folds up into a smaller package. It has a screen with general information about the drone’s status and the usual buttons and joysticks to control it. But it has no video monitor. Instead, you affix a smart phone running the DJI Go app (or another app; more on that later), to the controller. It has a moveable plug preconfigured for iPhone users, but also comes with other plugs for other smartphones. You plug in your phone and then clamp it into the controller. The clamp is tight and, miraculously, lets me keep the bumper cover I have for my phone on the phone. The phone is definitely not going to fall out. My only complaint, which is minor, is that I have difficulty tapping the home button since it’s partially covered by the clamp. I think that if I fiddle with it enough and experiment with different positions, I might be able to make that problem go away.

The controller and a smart phone work together to control the drone. I’m pretty sure you can control it without a smart phone, but I suspect it would be a lot more difficult, especially since you would not be able to see what the camera sees without the camera as a monitor.

There is a lot to learn about the controller and the DJI Go app. Yes, you can pick it up and fly it almost immediately with just a few pointers from a friend or a quick glance through the manual, but you will never master either flying or photography — which really do need to be considered separately — without reading the manual and trying various features until you learn what works for you.

My only gripe about the controller setup is age related: my older eyes simply can’t see the video feed on my phone as well as I’d like them to. Yes, I wear readers. And yes, I stand with my back to the sun to shield the screen from direct sunlight. But still, in monotonous terrain — like the desert where I’ve been flying lately — it’s sometimes hard to figure out what the camera is looking at. More than a few times, I sent the drone forward only to discover that it was pointing in a different direction than I thought it was. Oops.

User Guides

The User Manual — which is only available online as a PDF — sucks, plain and simple.

At 59 pages long, which includes the cover and a lot of pages that simply don’t provide any real instructions, it provides just enough information for someone knowledgeable about flying or photography to figure out what they need to do to fly and shoot photos/video. But if you’re a complete newcomer to either one and think you’re going to race around trees in a forest while filming exciting video sequences on Day One, you’re only fooling yourself. I’m constantly going back to it, looking up features I think should be available, finding bits and pieces of information, and then putting it all together to learn a new task. I’m thinking I might write up some task-based tutorials for myself and others who might need them.

The Quick Start Guide, which comes in a tiny booklet, has only 10 pages of information between front and back covers. The printed version has multiple languages in it, which makes it seem a lot larger than it is. It’s also available as a PDF with just one language. Again, if this isn’t your first drone, it’ll definitely have enough information to get you started. Otherwise, good luck.

Flight

Okay, this is where I’m completely blown away: the automatic features for flight are amazing.

While it is possible to manually take off using the joysticks — and my friend Jim taught me how to do this on his Phantom 4 — it also has an automatic takeoff feature. Tap a button and slide your finger across a confirmation screen, and the Mavic powers up and climbs to a four-foot, rock solid hover. It’s just amazing to watch, especially if you’re a helicopter pilot and understand what it takes to make such a smooth, solid takeoff in a helicopter. And yes, I understand that the aerodynamics of a four-rotor drone is different from that of a single main rotor helicopter.

Push the left (pitch/yaw) stick forward and the drone can climb straight up like a rocket at a maximum speed of 16.4 feet per second — that’s 984 feet per minute for us pilot types. Push the left stick right or left and the drone rotates. Pull the left stick backwards, and the drone descends at up to 9.8 fps (588 fpm). Helicopter pilots can equate the operation of the left stick to the collective (forward/back = pitch) and tail rotor pedals (left/right = yaw) on a helicopter, even though the stick controls different mechanical operations on the drone.

Push the right stick in any direction and the drone flies in that direction without changing the direction in which the nose (camera) is pointing. This is like a helicopter’s cyclic, although again, it controls different mechanical operations on a drone.

As you might expect, the farther you push a stick, the faster the drone moves.

Getting it airborne and actually flying it is remarkably easy — to a point. It’s precision flying that takes a lot of effort and practice. The drone acts immediately and rather abruptly to most control inputs, so if the video camera is turned on while rotating it or adjusting the angle of the gimbal, you can clearly see a sort of jerky response. Like learning to hover a helicopter, you need gentle control inputs. And that takes practice.

The Mavic has three modes for flying: Positioning (P), Sport (S), and Tripod. Most regular flying is done in P mode, which also has obstacle avoiding features enabled. If you want to fly faster and aren’t worried about obstacles, S mode is available with the flick of a switch on the controller. The difference in speed is about 20 miles per hour for P mode vs. 40 miles per hour in S mode. Tripod mode, which I hope to explore today if the wind isn’t as bad as forecasted, slows everything down, making it easier to get smooth video shots.

DJI Go app options make it easy to keep the drone from wandering off where it shouldn’t be. The very first thing I set was the maximum altitude — in the U.S. drones are limited to 400 feet AGL unless an FAA waiver is obtained. I also limited its distance, at least at first. While the Mavic’s dark color makes it easy to spot in the sky, it’s easy to lose sight of it if you take your eyes off of it while it’s moving. I recommend operating with a spotter whenever possible. I usually hear it better than I see it, unless I’m in a noisy environment. I do believe, however, that it’s a little quieter than Jim’s Phantom 4. They both sound like angry bees — and believe me, as a beekeeper I know exactly what angry bees sound like — but Jim’s drone sounds like more angry bees than mine.

I believe there are limitations built into the software that prevent operation near airports, but I haven’t been close enough to an airport yet to test that. If so, it’s a good feature that pilots should be happy about. (Now if only they’d limit climb to 400 in the software instead of making it an option. Out of the box, the Mavic has an operating ceiling of more than 18,000 feet, which is absurd.)

Landing the Mavic couldn’t be easier. Really. I use the automatic landing feature almost all the time. It eliminates the need to navigate back to the home base. Just tap a button and use a slider to confirm you want the drone to return to home. It immediately turns back to its starting point, climbs if necessary, and heads back at top speed (for its mode). You can watch the distance change on the controller. When it’s overhead, it might look as if it has passed the landing zone, but it hasn’t. It turns to the direction it was facing when it took off, then descends straight down. When it’s less than 10 feet from the ground, it might make some adjustments. At about three feet up, it pauses and then comes right down to the ground and shuts its engines. The whole time it’s doing this, the controller is letting out an annoying beep-beep-beep, displaying an option that enables you to take over. That’s because obstacle avoidance is disabled while landing and you might need to stop the auto land feature. I’ve found, however, that in good conditions with precision landing enabled, the Mavic lands exactly where it took off from. To me, that’s the coolest thing of all.

Photography

Tyson Wells from the Air
A view of Tyson Wells from the air, looking southeast.

The thing that changed my mind about drones, as I discuss in a blog post from December, is the quality of photographs and video — especially video — from drones. I’d seen videos from my friend Jim’s and I was hooked. They were, by far, clearer and steadier than most video shot from my helicopter. It was no wonder videographers were turning to drones. They could get better results for less money.

(I do need to point out again here that for aerial photo jobs covering a large area, you’ll definitely get the job done faster in a helicopter. As I mentioned in my December 23 blog post:

But another client needed aerial video and still images all along the Columbia River from Wenatchee to Chelan, then up the Wenatchee River to Leavenworth and up Lake Chelan to Stehekin. This was well over a hundred miles to cover and some of it was inaccessible by car. We got all of the shots in less than three hours of flight time. It would have taken weeks to get that footage with a drone — and even then, some of it would have been impossible to get.

So don’t give up completely on helicopters. Think about the mission before deciding on the tool.)

I’ll admit that it sort of broke my heart when I realized that the GoPro “nosecam” videos I’d been sharing were absolute crap compared to what I could get with a drone. If you can’t beat them…

So here I am with my own aerial camera — which is what the Mavic really is. It can do video with resolutions up to 4K, which is the default setting. I actually thought there was a problem with the camera when I tried to play back the video on my 5-year-old MacBook Air. The reality was that the computer simply couldn’t handle the amount of data in the video file. I’ve since set it down to 1090p, which is all I need, at least for now. The video is amazing: smooth and clear. I’ll let you see for yourself; if you can, view these in full screen at the highest resolution YouTube offers:


In this example, I’ve put the Mavic into a 200-foot hover at the edge of an outdoor sale event in Quartzsite, AZ. Hands off on the controls and it’s rock steady. I couldn’t do that in a helicopter.


I shot this video yesterday morning. I flew out at 150 feet and back at 200 feet. This is the return flight, which seemed to have a better angle, using Return-to-Home mode. At the end, you’ll see me standing with a retired guy I met who used to program robots for airplane manufacturing. Keep in mind that this is only a small portion of the thousands of people camped out in the BLM land around Quartzsite right now.

I have not experimented much with still photos. I get so caught up in the flying and video that I forget to snap photos once in a while. It can save JPEGs at 12 megapixel resolutions. I’m not sure if it can save photos while it’s shooting video.

The camera is completely adjustable for automatic and manual settings. Again, I haven’t experimented much with this yet. Just getting it to fly where I want has been enough of a challenge for the first three days of flying. And the manual leaves out too many details; it’s hard enough just to find the settings.

Missions

Part 107 Explained
Want to become a commercial drone pilot? Start by learning all about the FAA’s Part 107. This book will help. Buy the ebook edition on Amazon or from Apple. Or buy the paperback edition on Amazon.

I’m teaching myself how to use the Mavic by creating “missions” for myself. A mission is a task I need/want to complete. Yesterday’s mission was to get video footage of the long stretch of desert near where I’m camped where so many other people are camped (see second video above). I wanted a nice record of the sheer volume of people dry camping here. I can repeat this mission in about a half dozen other places to get an even bigger picture of the weird situation in Quartzsite during the big RV show, but time is running out. The forecast calls for high winds today and the campers will start rolling out of here on Sunday.

Another mission is to video the activity around the RV show. That would entail setting up a point of interest in the middle of the show area and then flying the drone around it at a safe distance from participants with the camera continuously focused on the middle of the action. I’m hoping to do that on Saturday when the show is busiest. I might practice on a smaller scale with some of the camps around here first.

My goal is to understand what controls and settings to use to accomplish missions like these. I can then call upon what I’ve learned to complete missions for paying clients once I finish getting my commercial UAS pilot rating. I see drone photography as a component of the services Flying M Air can offer.

Ready to Buy a Drone?

My interest in drones seems to have sparked an interest in other people. I hope this blog posts helps them decide, one way or the other. In any case, I’m sure this isn’t the last you’ve heard from me about my Mavic Pro.

I do have a favor to ask, though. If you do decide to buy a drone and you want to buy from Amazon — which offers great prices and free shipping — please use one of my links. I get a tiny commission from sales that originate with a link from this site and I sure would appreciate the income to help cover my hosting fees.

How many mostly ad-free sites have you visited lately? Very few, I’ll bet. I guarantee that the folks who build and maintain them would similarly appreciate your support.

And if you’re interested in buying a gently used DJI Phantom 4, my friend Jim has one for sale — as soon as his Phantom 4 Pro arrives, anyway. I can put you in touch with him — but please, only if you’re serious. It’ll be a good deal, but he isn’t giving it away.